Here is a page of detailed instructions on how to set up your Aspergers Emergency Card. The process isn’t hard, but if you are having trouble, use this page to help. The instructions assume you are making a card for yourself. If you have questions, ask them in the Comments below.
1. Gather Your Information
You will need the following information to fill in the blanks on the card:
- Full name, home address and phone number
- Your birth date. This will help first responders identify you, and is very important if you are under 18.
- Medical conditions. Prepare a short list of any health problems, allergies, sensitivities, whether you wear eyeglasses or contact lenses, etc. Keep it short, you don’t have much space to work with.
- Name and phone number of two contact people. These are people who know you well and are willing to speak for you in an emergency. They can be parents, adult children, close friends or relatives, doctors or therapists. Get their permission first!
- A digital photograph of you. This will help people identify you, so the photo should show what you really look like (no glamour shots, costumes or bad lighting). It should clearly show your face. It will be put in a box roughly 1.6 inches wide by 1.75 inches tall (42mm by 44mm). You’ll be able to adjust the size of the photo but you can’t crop it later. Don’t obsess over the exact size. Any photo is better than none.
2. Navigate to the Order Page
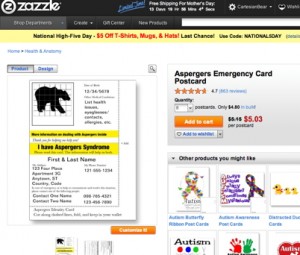
This one’s easy. Click this link to go to the Card’s page at Zazzle. You’ll see a page that looks like this.
Make sure you are on the Version 2.0 of the card! Version 1, which is shown on the photos here, doesn’t print correctly.
All the instructions here apply to version 2.0 of the card, though the photographs show version 1.
[The "Other Products You Might Like" were put there by Zazzle. I have no control over them, and wish I could remove them. The "Other Products by Cartesian Bear" are mine.]
See the orange button under the card image that says Customize It! Click that.
3. Customize Your Card
Once you’ve clicked Customize It!, you’ll see this:
I added the words in purple to show the sections that will be important for customizing the card.
You probably won’t have to use the move or size buttons, unless you have more text than the field is supposed to hold.
If you make a mistake: just close the web page and start over. Nothing is saved yet.
Click on the words “Change Text” on the field you want to work with. A dialog box will open where you can type your information. Delete the existing information and type.
Don’t click the X! This will delete the entire field from the card.
Keep entering text in the fields. You will need to scroll through the fields list to reach them all. For some reason, Zazzle changed to order of the fields in the list. Check carefully to make sure your information ends up in the right spot.
4. Add Your Photograph
Near the bottom of the field list is one field with a tiny image of the Cartesian Bear currently in the photo position on the card. Instead of saying “Change Text”, you’ll see “Change image”. It’s time to upload your photo.
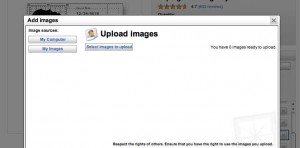
Click on the words as you did before. You see the Add Images dialog.
Click the On My Computer button in the left column, then the “Select Images to Upload” button in the middle. You’ll see your computer’s standard method to select a file. Find your photo file and choose it the way you’d normally choose a file.
At the bottom of the window, you’ll see an orange OK button. Click it, and Zazzle will take a minute or two to upload your photo and put it in place instead of the Cartesian Bear. Adjust the size if necessary by using the size buttons for big movements or dragging the handles on the photo for tiny movements.
Finish filling in all the fields. Check your work — once you click Add to Cart, you can’t make changes.
5. Finish Your Order
Is everything right? Good! You can now finish your order.
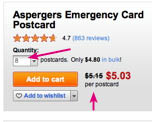
First, check the ordering information in the upper right:
Note: Zazzle may suggest you buy 8 identical cards, at $5.15 each. [Or less, if Zazzle is running a sale.] Maybe you want 8 identical cards. Maybe you want only one. In any case, look at this number and change it before you click Add to Cart.
If you want to make several different cards, go through all the steps, including Add to Cart, for each different card.
From here, the ordering process is the same as for any online order.
I hope these directions were easy to follow. If you have questions, ask them in the Comments below. I’ll answer there, or re-write the process here.


